Step 1: Run the Downloaded File
Double-click
the downloaded file to start the installation.
Step 2: Configure the Installation Wizard
After
running the installation file, the installation wizard welcome screen appears.
1. Click Next to
proceed to the next step.
 |
2. Choose
the destination folder for the Java installation files or stick to the default path. Click Next to proceed.

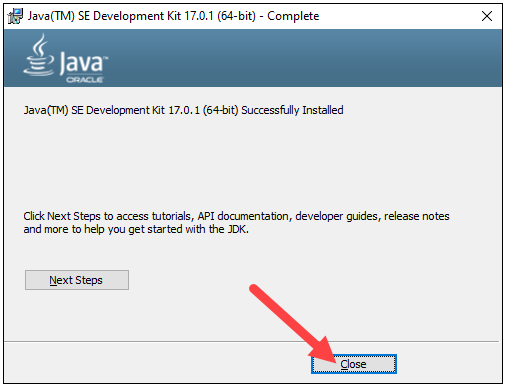
3. Wait for the wizard to finish the installation process until the Successfully Installed
message
appears. Click Close to exit the wizard.
 |
Set Environmental
Variables in Java
Set Java environment
variables to enable program compiling from any directory. To do so, follow the
steps below:
Step 1: Add Java to System Variables
1.
Open the Start menu and search for environment variables.

2. Select the Edit the system environment variables result.
 |
3. In the System Properties window, under the Advanced tab, click Environment Variables…

4. Under the System variables category, select the Path variable and click Edit:
5.
Click the New button and enter the path to the Java bin
directory:

Note: The default path is usually C:\Program Files\Java\jdk-17.0.1\bin.
6. Click OK to
save the changes and exit the variable editing
window.
Step 2: Add JAVA_HOME Variable
Some applications require the JAVA_HOME variable. Follow
the steps below to create the variable:
1.
In the Environment Variables window, under the System variables category, click
the New… button to create a
new variable.

2. Name the
variable as JAVA_HOME.
3.
In the variable value field, paste the path to your Java
jdk directory and click OK.
 |
4.
Confirm the changes by clicking OK in
the Environment Variables and System properties
windows.
Test the Java Installation
Run the java -version command
in the command prompt to make sure Java installed
correctly:
If installed correctly, the command outputs the Java
version. Make sure everything works by writing a simple program and compiling
it. Follow the steps below:
Step 1: Write a Test Java Script
1.
Open a text editor such as Notepad++ and create a new
file.
2. Enter the following lines of code and click Save:
System.out.println("Hello world!");
}
 |
3.
Name the file and save it as a Java source file (*.java).

Note:
When using Notepad, select All files for the Save as type option and add the
.java extension
to the file name.
Step 2: Compile the Test Java Script
1. In
the command prompt, change the directory to the file's location and use the following syntax to compile the
program:
javac [filename]
For
example:
After
a successful compilation, the program generates a .class file in the file directory.
2. Run the program
with the following syntax:
The
output shows that the program runs correctly, displaying the Hello world! message.